Unit Testing
Each line of code you design is testable, and the most efficient way to test it is through unit-tests. In fact, we should test code before the inception of the code itself. Sounds strange? Not really, this is called Test-Driven-Development, or TDD. Without unit-testing, we may be really shit developing rather than software developing. Unit-Tests provide an important barrier very, very close to the developer to ensure quality at inception of the code.
Without unit-tests:
You cannot assess how well the code will work (if at all)
Someone could alter the code and easily break it (software regression)
Refactoring and improving the code is much harder, and time consuming
Definition
Typically automated; GDB is not a replacement
Testing one code module at a time, such as
file.cWrite code to test code (same programming language)
Write a test case for each line of production code
Write a code module and test it, such as
memory_buffer.c
Unit Testing (UT) is not necessarily testing it on your board
Typically, UT means you test it on the machine that is compiling the code Hence, no need to load the code to the target, or the embedded processor
Using a
printfto manually inspect whether your code works is not unit-testing
In some industries such as Aerospace, it is required to run UTs on your target
This validates that the compiler for the target is free of bugs
For example, if you run UT on x86 machine, and your code is targeted on Cortex-M4, then that proves that the code will work on x86, but not necessarily on the M4
Benefits
Develop without hardware
Refactor code with confidence
Reduce the costly debugging sessions
Significantly Accelerate development
Establish a strong barrier against bug leaks
Serves as a double check during development
Reduce the discovery, investigation, and patches for software bugs
Get immediate feedback if the code is working as the developer intended
Cost
The cost of writing unit-tests is negligible compared to the cost of finding and patching a bug at a later time. This cost is not just the developer time alone, but also the time of many other parties involved, including the customer itself which suffers from lost productivity. It is easy to test weird scenarios your code could get into during unit-tests, and it is difficult to force your code to go into complex scenarios during product's integration tests.
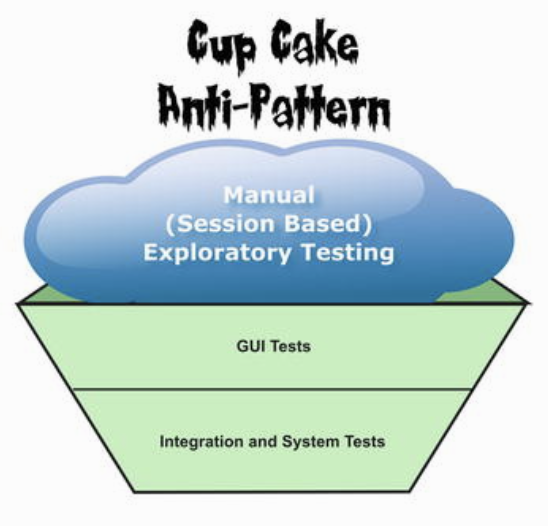
Clean C++

The cost of writing a UI test is often high, and hard to automate. In terms of raw code, it is easy to write an automated test and focus towards a very precise functionality and it is usually difficult to inject and create certain test scenarios towards the higher end of the pyramid. The cost of creating the anti-pattern below is prohibitively high.
Clean C++
Pitfalls
Unit-Tests take too much time and slows me down

This is the most popular fictional statement. It is like saying that you do not have time to fix your bicycle when you have miles ahead to travel.
Unit-Tests are lot of maintenance
This should signal code smell, possibly in the unit-test code, production code, or both. Fundamentally, code should be modularized, and designed for simplicity to reduce maintenance. If unit-tests are a lot of maintenance, then they can probably be improved, and this may indicate potential problems with the production code.
We will hire an intern to do unit-testing later
This is an lol statement. Usually, later will never happen anyway. Further, if your code was not designed with testing in mind, then it is probably not testable. Without tests in the first place, the code likely suffers design and quality issues, and trying to perform unit-testing after the fact is not that useful. If the thought of UTs comes after the code is written, some of the benefits are already stolen from you.
It is the developers responsibility to deliver code that is believed to be bug-free, unit-tests provide a good way to ensure high quality before another un-biased party tests your code as a product black-box.
Test Frameworks
Unfortunately C and C++ do not have unit-testing built into the language, and therefore there are many test frameworks that came to existence.
None
Simply use
<assert.h>
C & C++ Frameworks
Check (C)
CGreen (C and C++)
Boost (C++)
Google Test & Google Mocks (C++)
Unity & CMock – C Test framework
This README is focused on this
Small foot-print to run on the microcontroller itself
Combined with Cmock, provides huge value to UT and “mock” APIs
Comparisons
Unity & CMock
The Unity & CMock framework is one of the best frameworks we have found for C language. There has not been anything fundamental this framework lacks, and it reduces a lot of coding effort because it generates the Mock functions for you. You can read about these two frameworks here but it is advisable to read this article first.
Unity
There are two basics things to understand about a unit-test framework. The first is the unit-test framework itself; this only provides the ability to perform assertions and write tests in a way that the framework understands how to run. Some frameworks allow you to “register” for the tests, and then they will invoke all of the registered tests. Other frameworks may either use macros that register themselves, or use scripts at compile time to register and run your test methods. Unity provides the ability to run tests in a structured way.
#include "unity.h" // Single Unity Test Framework include

void setUp(void) {
}
void tearDown(void) {
}

void test_something(void) {
  TEST_ASSERT_EQUAL(1, 1);
}
CMock
CMock creates mocks and stubs for C functions. It's useful for interaction-based unit testing, where you want to test how one module interacts with other modules. Instead of trying to compile all those real units together, CMock helps you by creating fake versions of all the "other" modules. You can then use those fake versions to verify that your module is working properly!
A secondary artifact for a test framework is the "mock" functionality. The mocks provide the ability to mock-out an API and hijack the functions calls outside of your code module. For instance, you can mock an API that is going to delete a database and perform assertions. The objective would be that you are testing a code module that is interfacing to a database, but you don’t want to use the database code module itself and instead want to use a dummy mock. This will make a whole lot of sense during our unit-test examples.
CMock is useful when you wish to test a piece of code without inheriting another code module. In the following example, our focus is to test my_app() but we want to Mock database_connect() function and make it return either NULL or a pointer to the database to test further code. CMock in this scenario would allow you to "stub" the database.h API, inject, verify parameters, and make functions return whatever values you wish.
#include "database.h"

void my_app(void) {
  db_s *db = database_connect("google");
  if (NULL != db) {
    // Test this code
  }
}
In your unit-test, you can then do this:
#include "Mockdatabase.h"

void test_my_app(void) {
  // This 'Expect' API is auto-generated by CMock
  database_connect_ExpectAndReturn("google", NULL);
  my_app();
}
CMock Plugins
CMock has many plugins that are built when you compile the library. You can simply enable all of them because it is up to your test code to use it or not. Including more plugins than necessary should not cause any side effects.
ignoreignore_argexpect_any_argsarraycexceptioncallbackreturn_thru_ptr
Test Driven Development
This design technique should be used when the requirements of the code are clearly stated. It is meant to simplify code, and produce minimal code necessary to solve a problem.
One of the goals to keep in mind is that It is about how little code solves a problem, not how much and TDD helps you with this.
Create empty tests
Write failing test
Write just enough code to pass
Refactor the code, cleanup and optimize
Repeat until all tests are passing
Benefits
No dead code
Sign off with stakeholder
Unit Tests shape your production code
In TDD, after you write a test, and just enough code for the test to pass, it reaches a critical point of success:
Now we have reached a remarkable point in the process. If the tests pass now, we always have 100% unit test coverage at this step. Always! Not only 100% in the sense of a technical test coverage metric, such as function coverage, branch coverage, or statement coverage. No, much more important is, that we have 100% unit test coverage regarding the requirements that were already implemented at this point!
Stephan Roth. “Clean C++.”
Example
Let's design a buffer module with TDD.
TODO Screencast with example
Philosophy
The most popular argument against writing unit-tests is that they slow down development. Absolutely nothing could be farther away from reality for this statement. If I could let me nerves respond to this comment, I would respond back by saying that whoever has made such claims is either an incompetent developer, or is simply not experienced enough. This sentiment may exist because the developer has simply not practiced unit-testing to reveal the benefits to debunk this assumption.
Clean C++ shares more or less the same sentiment on the benefits of unit-tests:
Fixing bugs after software has shipped is more expensive than having unit tests in place
Unit-tests give an immediate feedback about your entire code base. Provided that test coverage is sufficiently high (approx. 100%), developers know in just a few seconds if the code works correctly.
Unit tests give developers the confidence to refactor their code without fear of doing something wrong that breaks the code. In fact, a structural change in a code base without a safety net of unit tests is dangerous and should not be called Refactoring.
A high coverage with unit tests can prevent time-consuming and frustrating debugging sessions.
Unit tests are a kind of executable documentation because they show exactly how the code is designed to be used. They are, so to speak, something of a usage example.
Unit tests can easily detect regressions, that is, they can immediately show things that used to work, but have unexpectedly stopped working after a change in the code was made.
Unit testing fosters the creation of clean and well-formed interfaces. It can help to avoid unwanted dependencies between units. A Design for Testability is also a good Design for Usability...
Refactoringwithout tests isn’t refactoring, it is just moving shit around— Corey Haines
Aim for 100% Test Coverage
Setting a high bar yields high quality software. Anything less than 100% coverage is an arbitrary number, and therefore, the only acceptable measure should be exactly 100% code coverage. As developers write a line of code, it should be immediately tested. This discipline pays off well because the code is testable to begin with, and often times, the developers would be motivated to write less code to solve a problem. Remember that It is not how much code you write, it is how little said one of my past co-workers, and I still remember that statement today.
Emphasize the tests that matter
There may be code that is way too trivial to test. For example, if an RTOS task code, or the code of a main() function is kept simple (and branchless), then that may be once place you can skip the unit-test effort. Generally, creating rules, and then creating exceptions is not the way to go. However, there are certain situations where this particular logic makes sense.
The case we are setting forth is that top level “glue code” may be exempt from 100% code coverage. Experience suggested that when the code is modularized, it was always the modules that were at fault, but not the code that glued different pieces together. This glue code should have the following properties:
No branches
Uses dependency injection to connect objects
Runs a periodic loop or spawns a task
We encourage this rule because even if we were to test this branchless code, the only thing we would test is that certain code is called in the right order with the appropriate parameters. Let’s demonstrate this by example using a top level RTOS task.
void rtos_task(void) {
  buffer_s buffer;
  char buffer_space[512];
  buffer_init(&buffer, buffer_space, sizeof(buffer_space));

  tcp_connection_s conn;
  tcp_connection_listen(&conn, 1200, &buffer);

  FOREVER {
    tcp_connection_service(&conn, our_callback);
  }
}
In the code above, we have these things going on:
Setup a buffer of 512 bytes
TCP connection being setup on port 1200
Loop to service the TCP connection
The unit-test for this code would look like this:
void test_rtos_task(void) {
  buffer_init_Expect(ignore_stack_var, ignore_stack_var, 512);
  tcp_connection_listen_Expect(ignore_stack_var, 1200, ignore_stack_var);
  tcp_connection_service_Expect(ignore_stack_var, our_callback);

  // Carry out the test to validate expected function calls
  rtos_task();
}
You should be able to now reason with this approach, but we have to proceed with a discipline that rightfully justifies this exception. In the test code above, all we are really doing is testing if certain functions are getting called, but there is no branch logic to test. The 100% code coverage of buffer, tcp_connection is actually responsible to make sure that the code works well, and there is little that could go wrong in this top-level RTOS task. Sure, you could go ahead and test that the tcp connection is not getting passed a NULL pointer for the buffer, but it is trivial enough to ensure this by running perhaps the simplest test on your target platform.
The task level code should just be the glue code that connects the TCP connection to our buffer, and then the connection utilizes the buffer to perform I/O. Statistically speaking, there is little that can go wrong in this code as it is just few jigsaw pieces that we need to connect. The actual bugs are likely to occur inside of the buffer or the TCP connection code modules, and the suggestion is to maximize the testing to 100% in these modules, rather than focusing on top level glue code that simply pieces things together.
Positive and Negative Testing
Positive and negative testing is a fundamental mindset when testing any unit. It is the idea of testing against both valid inputs and invalid inputs. Testing against invalid inputs ensure the unit under test is sufficiently robust enough to handle irrational inputs.
/*
 * Calculate current: I = V/R
 * Where I = current, V = voltage, R = resistance
 */
float calculate_current(float voltage, float resistance)
{
    float current = 0.0F;
    if (resistance > 0.0F) {
        current = (voltage / resistance);
    }
    return current;
}
In this scenario, the valid input domain for resistance R is (0.0, FLOAT_MAX]. Voltage can be anything in this case.
Positive test cases (test rational resistances)
Expect calculate_current(0.0, 1.0) == 0.0
Expect calculate_current(0.0, FLOAT_MAX) == 0.0
Negative test cases (test irrational resistances)
Expect calculate_current(0.0, 0.0) == 0.0 (No runtime divide by 0 exception should occur)
Expect calculate_current(0.0, -1.0) == 0.0 (No runtime divide by 0 exception should occur)
Basics of Unity & CMock
The Unity and CMock unit-test infrastructure relies on developer discipline to create files with consistent names:
your_module.hExample:gps_string_parser.hyour_module.cExample:gps_string_parser.ctest_your_module.cExample:test_gps_string_parser.c
The Test framework automatically picks up source code that starts with test_ and then begins to create an executable specifically to perform the unit-test of one file at a time.
How it works
Unity and CMock framework uses Ruby and Rake to turn your test_your_module.c into a standalone executable What this means is that each test_* is actually a separate executable and is compiled by resolving the header files you included in this test_your_module.c source file.
Run Tests
Running the Unity test framework with rake is very simple.
Go to the folder that contains
rakefileType
rakeon the command-promptTo run a single test, type
rake unit single_file=code_test\test_simple.c
The
rakebuild system will run all unit-tests as separate executablesEnsure that
gcc.ymlcontains the paths to your source code
Files of the Test Infrastructure
There are a few ruby files that glue things together.
rakefileThis is the entry point when you type
raketo run the testsAdditional logic can be added here to customize the unit-test framework
rakefile_helper.rbrakefileuses this code to compile and run testsWe built this from the Cmock example, and customized it
gcc.ymlrakefile.rbuses this configuration to compile your code
How it Builds
The ruby script forms a list of all tests that begin with
test_in yourcode_testfolderScript compiles a separate executable for each test
This means each unit-test file, such as
test_buffer.cis a standalone programAll dependencies need to be #included in your
test_file
As part of the compilation of the unit-test executable, files are mocked
Each
#includethat begin with#include "Mock"will not build the real code, but instead it will build Mocked codeFor
foo.h, it will beMockfoo.handMockfoo.catut_build/mocks
Be careful of nested dependencies, such as your
code_under_test.cdepending onbuffer.cIf there is a dependency you
#includewhich has another dependency, you will also need to#includethose dependencies in yourtest_code_under_test.cas well. So if you do not mockbuffer.c, then you will also need to build the real sources that thebuffer.cdepends on.The other option is to mock the header file to avoid picking up nested dependencies. So if you
#include "Mockbuffer.h"then you do not need to worry about the nested dependencies ofbuffer.c
Behind the scenes, the script will include all files you included in your test_buffer.c and use that to build the executable. The trick is that the files that are #included as Mockfoo.h are mocked, meaning that the header file is used to initially compile, but the code is linked to the CMock, instead of the real foo.c file.
Available APIs
In a lot of the sample code below, we will see some "magical" APIs, so let us first unravel the mysteries and point out what kind of function you get with Unity and CMock.
Unity
Unity provides you with:
Assertion APIs
setUp(),tearDown()invocations before and after each test method
// Check unity.h for more examples

#define TEST_ASSERT_EQUAL(expected, actual)  ...

#define TEST_FAIL_MESSAGE(message)    ...
#define TEST_FAIL()                   ...
#define TEST_IGNORE_MESSAGE(message)  ...
#define TEST_IGNORE()                 ...
#define TEST_ONLY()                   ...

// There are many more asserts, but we do not want to repeat them here
CMock
The idea behind the Mocks is that sometimes you want to test a module and you do not want to inherit the functionality of another object that you have little or no control over. Consider a naive piece of code that you wish to test.
// @file database.h
typedef struct {
  void *data;
} db_s;

db_s *database_connect(int id);
#include "database.h"

void app_test(void) {
  db_s *db = database_connect(10);

  if (NULL == db) {
  } else {
  }
}
In the naive example above, you wish to perform two tests:
When
database_connect()returnsNULLWhen
database_connect()returns a valid database pointer
CMock provides the Mock functionality. It extends the Unity assertions, but fundamentally provides you with a make system to stub out an external module's functionality with a fake one.
The APIs are dynamic and auto-generated based on the file/module being mocked. What really happens is that when your test_app.c performs a #include "Mockdatabase.h", then the build system purposely omits the real database.c and replaces the implementation with Mock replacements.
// If your header file contains a single function, such as:
db_s *database_connect(int id);

// Then the following APIs are auto-generated
#define database_connect_IgnoreAndReturn(cmock_retval)
#define database_connect_ExpectAnyArgsAndReturn(cmock_retval)
#define database_connect_ExpectAndReturn(id, cmock_retval)
#define database_connect_IgnoreArg_id()
The test code for app_test() would look like this:
#include "unity.h"
#include "app.h"

#include "Mockdatabase.h"

void test_app(void) {
  database_connect_ExpectAndReturn(10, NULL);
  app_test();
}
To Mock or not to Mock?
This is an important decision. A general guideline is that:
Do not Mock APIs that are very trivial
Example:
bit_count.hLet the bit counting happen the way its meant to be
Mock code modules when
Code modules are more complex; example:
database_connect()Code modules may create a distraction from the object under test
You have two options; the first option is to #include "bit_count.h" at your unit-test file. This way, you do not mock this file but inherit the real functionality of this file.
Sometimes, it is easier to build the real code, such as a simple utility called bit_count.h and it is better to not mock this file. At other times, it is better to be able to hijack an API and make it do what you want for the sake of ease of unit-testing. The idea is that you are unit-testing your module, and you don't want to depend on a behavior of another module you inherited. The testing of the other module is the other module's responsibility, and not yours.
#include "unity.h"
#include "app.h"

// Build the real code using 'bit_count.c'
#include "bit_count.h"

void test_app(void) {
  // ...
}
The second option is to mock this header file such that you can hijack its function calls, inject and return data for the sake of unit-testing. Which option you choose depends on your test.
When you include Mockbit_count.h, the UT framework will not build and include the real file bit_count.h. Instead, it will redirect the API as given in your header file with the mock framework's implementation which will impose Expect requirements in your unit-tests. The Expect API has a few flavors as listed in the next section.
#include "unity.h"
#include "app.h"

// Use the 'database.h' and do not build 'database.c'
// Instead, generate Mock APIs referencing 'database.h'
#include "Mockdatabase.h"

void test_app(void) {
  // ...
}
Mock Variations
Mocks always provide StubWithCallback which means you can install your own Mock function. Typically, other variations provided should be able to do the job, but the callback can be used to do perhaps a fancy operation inside of the Mock.
The Ignore() should rarely be used. It means that always ignore whenever a function invocation occurs. The ExpectAnyArgs() is better because at least you are stating that a function is expected. Once you do Ignore() in a test function, then whether a function is called zero times, or a million times, it really is ignored.
Expectfor functions that do not return a valueExpectAndReturnfor functions that return a valueExpectAnyArgsAndReturnto ignore input arguments but return a valueIgnoredangerous method of just ignoring the expectationIgnoreAndReturnIgnore but always return something for functions that return a valueStubWithCallbackUse a custom callback that can have a small test driver of your own
What this means is that:
For a function with no return values:
void foo(void), you will have:foo_Expect()- Expect a function call to occurfoo_Ignore()- Ignore the function call (if any)foo_StubWithCallback(your_func)- Go to youryour_func()whenfoo()is called
For a function with a return value:
int foo(void), you will have the wordAndReturn:foo_ExpectAndReturn(#)foo_IgnoreAndReturn(#)foo_StubWithCallback(func_ptr)
Mocks for functions that have arguments are covered in the next section, but here is a brief summary to get the idea of the generated API.
For a function with arguments:
void foo(int arg_name), you will have:foo_Expect()- Expect a function call with specific argument valuesfoo_ExpectAnyArgs()- Expect the function with no checks on any of the argumentsfoo_IgnoreArg_arg_name()- After expecting a function call, ignore a particular argumentfoo_StubWithCallback(func_ptr)
Parameters
For each function parameter, you would have another API available per parameter. The Ignore_arg_name() API should be called after setting up the Expect().
For example, if a function to mock is void foo(int a, int b), then the following APIs are generated:
foo_Expect(#, #)- Expect a function call with specific argsfoo_ExpectAnyArgs()- Expect the function call with any argsfoo_Ignore()- Ignore the function call (if any)foo_IgnoreArg_a()- Invoke afterfoo_Expect(a, #)to ignore the first parameter valuefoo_IgnoreArg_b()- Invoke afterfoo_Expect(#, b)to ignore the second parameter value
Pointer Parameters
Functions that use pointers as parameters have more variations. For each pointer parameter, you have the following options available:
ReturnMemThruPtrModify something inside of a parameter that is a pointerFor example, if the function parameter was named
ptrthen:ReturnThruPtr_ptr()will be availableGood candidate if your pointers are
void*and the length of the data is not known
ReturnThruPtrUse when your type is known, such as
void foo(int *)You can then ask the Mock to return a type:
int value = 2; foo_ReturnThruPtr(&value);
ReturnArrayThruPtrSimilar to
ReturnThruPtrbut you can return an array of integersint values[] = {11, 22}; ReturnArrayThruPtr(&value, 2);
Add a Unit-Test file
If you don't want to get your hands dirty, and you want to simply leverage from the test infrastructure that is setup for you, then there is little to do:
Create a new C module
You may have to edit
gcc.ymlto include the new folder path of your new module
Create a new file that begins with
test_and put it in your test folderExample:
test_buffer.c
Go to your test folder in a command-shell
Type
raketo run all unit-testsAll test files at
<your_test_dir>/testswill execute their unit-tests
Unit Test Best Practices
Exclude third party code
Unit-test should run extremely quickly (in second)
Keep tests focused; one test per functional
Code quality for tests should be equal to the production code
Avoid hacks and blocks of
#ifdef UNIT_TESTINGin your production codeTest should be independent from each other
Clean-up after each test
Unit Test Examples
Test Template
The template demonstrates the basic Unity Test Framework
Framework picks up all functions that start with
test_Each
test_is surrounded by function invocations ofsetUp()andtearDown()Since there are no include files other than C library, no further files are included while building the executable
#include "unity.h" // Single Unity Test Framework include
#include <stdio.h>

void setUp(void) {
  puts("\nsetUp() is called before each test_* function");
}
void tearDown(void) {
  puts("tearDown() is called after each test_* function (unless test is ignored)");
}

void test_passing(void) {
  TEST_ASSERT_EQUAL(1, 1);
}

void test_failing(void) {
  TEST_FAIL_MESSAGE("Intentional Failure");
}

// Note: tearDown() will not be called due to the test being 'ignored'
void test_ignored(void) {
  TEST_IGNORE();
}
Test Results
The unit-test above is very simple and in fact it does not test anything at all because we have no code module we are including and we are not invoking any functions. In any case, here is the code output that you will see when you run the test. Note that automatic function invocations that the unit-test infrastructure is performing for you.
rake unit single_file=test_code\test_sample.c
Running single unit-test: test_code\test_sample.c
--------------------------------------------------------------------------------
Compile and run: test_code\test_sample.c
ut_build/test_sample.exe

setUp() is called before each test_* function
tearDown() is called after each test_* function (unless test is ignored)
test_code\test_sample.c:12:test_passing:PASS

setUp() is called before each test_* function
test_code\test_sample.c:17:test_failing:FAIL: Expected TRUE Was FALSE
tearDown() is called after each test_* function (unless test is ignored)

setUp() is called before each test_* function
test_code\test_sample.c:21:test_ignored:IGNORE

-----------------------
3 Tests 1 Failures 1 Ignored
FAIL
Test Hello World
The simplest test is a code module that you feed input, and it spits out an output. This should be the preferred software design to make modular code and improve testability. Sometimes, it may be surprisingly simple to change a code module from one that calls another code module, to one that is independent of another code module.
The bit_counter example given below is very naive, but demonstrates a code module that does not depend on any external function call other than function invocations within itself or the standard C library.
bit_counter.h
#include <stdio.h>

uint32_t bit_get_count_uint8(uint8_t value);
bit_counter.c
#include "bit_counter.h"

uint32_t bit_get_count_uint8(uint8_t value) {
  uint32_t count = 0;
  while (0 != value) {
    count += (value & 0x01);
    value >>= 1;
  }
  return count;
}
test_bit_counter.c
#include "unity.h"
#include "bit_count.h"

// Note: setUp() and tearDown() are optional to write

void test_bit_get_count_uint8(void) {
  TEST_ASSERT_EQUAL(0, bit_get_count_uint8(0));
  TEST_ASSERT_EQUAL(1, bit_get_count_uint8(1));
  TEST_ASSERT_EQUAL(2, bit_get_count_uint8(3));
  TEST_ASSERT_EQUAL(7, bit_get_count_uint8(0xFE));
  TEST_ASSERT_EQUAL(8, bit_get_count_uint8(0xFF));
}
An Example without a Mock
In this example, we walk through a typical way a software developer would write the code, and demonstrate how we can do dependency injection and improve the code's testability aspect while improving its quality, and make it more reusable.
Typical Code
Here is the typical code that one may write for a hypothetical persistency module.
#include "gpio.h"

// Simple module that becomes "persistent" when module_run()
// is invoked and the GPIO is set 8 times persistently
typedef struct {
  uint8_t status;
} module_s;

bool module_is_persistent(module_s *module) {
  return (0xFF == module->status);
}

void module_run(module_s *module) {
  module->status <<= 1;
  module->status |= gpio_get() ? 1 : 0;
}
Improved Code
void module_run(module_s *module, bool condition) {
  module->status <<= 1;
  module->status |= condition ? 1 : 0;
}
We made a very subtle but significant change. We simply feed a boolean as the input rather than crudely calling a concrete GPIO API.
Our
moduleis no longer dependent on a particular GPIOWe can reuse it for another purpose
While testing, we do not have to work with
gpio.hdependency
Since we improved the code, our code module is now independent of other code modules, and we will not need to Mock anything. As a result, our testing is simplified because this is a simple input/output module.
Unit Test Simplified Persistency Module
Since our module was simplified and no longer invokes an external function such as gpio_get(), we can test it more easily because we can feed the input to our function, rather than the function collecting it from a concrete API.
#include "unity.h"
#include "module.h"

void test_module_is_persistent(void) {
  module_s module = {};

  TEST_ASSERT_FALSE(module_is_persistent(&module));
  for (int i = 0; i < 7; i++) {
    module_run(&module, true);
  }
  TEST_ASSERT_FALSE(module_is_persistent(&module));

  module_run(&module, true);
  TEST_ASSERT_TRUE(module_is_persistent(&module));
}
An Example with a Mock
Do not worry if your code module invokes external code modules. Of course, this will happen in your software because code modules are meant to connect with each other. This is where CMock comes into the picture, and provides you with a way to hijack real APIs and mock them out to facilitate unit-tests.
Let us go back to this piece of code that we previously improved; in other words, let us go back to the code which depends on a gpio function call internally and assume this cannot be changed for whatever reason.
// OLD module that we developed (before we improved it)
typedef struct {
  uint8_t status;
} module_s;

bool module_is_persistent(module_s *module) {
  return (0xFF == module->status);
}

void module_run(module_s *module) {
  module->status <<= 1;
  module->status |= gpio_get() ? 1 : 0;
}
The unit-tests for this would look like this:
#include "unity.h"

// This is the code module we are testing
#include "module.h"

// Instead of the real "gpio.h", we will mock it with CMock's GPIO API
// Under the hood, CMock framework will auto-generate code
#include "Mockgpio.h"

void test_module_is_persistent(void) {
  module_s module = {};
  TEST_ASSERT_FALSE(module_is_persistent(&module));

  // When "gpio_get()" is called, we tell CMock API
  // to return "true" back to the real code of module_run()
  for (int i = 0; i < 7; i++) {
    // What you are saying is that when "gpio_get()" is called
    // You want CMock to expect the function call and return true
    gpio_get_ExpectAndReturn(true);

    // Setup "expect" function calls before calling the function
    // which is meant to invoke "gpio_get()"
    module_run(&module);
  }
  TEST_ASSERT_FALSE(module_is_persistent(&module));

  gpio_get_ExpectAndReturn(true);
  module_run();
  TEST_ASSERT_TRUE(module_is_persistent(&module));
}
Mock with a Callback
Callbacks are designed by adding int call_count at the end of a function. What you are trying to do is that when the gpio_get() is invoked, you want to replace the same function with your own.
bool gpio_get(void)becomes:bool gpio_get(int call_count)and then you can callgpio_get_StubWithCallback()And
void foobar(int a, void *b)becomes:void foobar(int a, void *b, int call_count)
#include "unity.h"
#include "module.h"
#include "Mockgpio.h"

bool gpio_get_hijacked_stub(int call_count) {
  // first time this function is called, call_count will be zero
  if (call_count < 9) {
    return true;
  } else {
    TEST_FAIL_MESSAGE("gpio_get() should not be called the 10th time");
    return false;
  }
}

void test_module_api_with_stub_callback(void) {
  module_s module = {};

  // Once you StubWithCallback, Test Framework will ALWAYS invoke
  // gpio_get_hijacked_stub() whenever gpio_get() function is called
  gpio_get_StubWithCallback(gpio_get_hijacked_stub);

  TEST_ASSERT_FALSE(module_is_persistent(&module)));
  for (int i = 0; i < 7; i++) {
    module_run(&module);
  }
  TEST_ASSERT_FALSE(module_is_persistent(&module));

  module_run(&module);
  TEST_ASSERT_TRUE(module_is_persistent(&module));
}
Expects stack up
The Expect() API can stack up, and you can put them inside loops too. If the number of calls to a Mock function do not match, then the test will fail. What this means is that if you do not setup an Expect() and it is actually called by the code under test, then the test will fail.
// Assume this file contains an API 'bool db_connect(void)'
#include "database.h"

void my_app(void) {
  // Attempt to connect to the database with retries
  for (size_t retries = 2; 0 != retries; --retries) {
    if (db_connect()) {
      break;
    }
  }

  // ... do something with the database
}
Unit-test code
#include "Mockdatabase.h"

void test_my_app(void) {
  // First time db_connect() is called, return false
  db_connect_ExpectAndReturn(false);

  // The second time return true
  db_connect_ExpectAndReturn(true);

  my_app();
}
Test Parameters
This example provides the sample code in which you can verify if your module under test is calling other code modules with the correct parameters.
// database.h
db_s * database_connect(const char *url, uint16_t port);
// File under test
#include "database.h"

void app(void) {
  db_s * db = database_connect("google", 1234);

  if (NULL != db) {
    // do something
  }
}
// Unit-Tests
#include "unity.h"
#include "app.h"
#include "Mockdatabase.h"

void test_app(void) {
  // Strings work well with `Expect` APIs
  // Last parameter for this function returns a value
  // out of the database_connect() function
  void *db_to_return = NULL;
  database_connect_ExpectAndReturn("google", 1234, db_to_return);

  app();
}
More ways to test Parameters
// database.h (file to be Mocked)
db_s * database_connect(const char *url, uint16_t port);
// File under test
#include "database.h"

void app(void) {
  db_s * db = database_connect("google", 1234);

  if (NULL != db) {
    // do something
  }
}
#include "unity.h"
#include "module.h"
#include "Mockdatabase.h"

void test_app__Ignore(void) {
  database_connect_IgnoreAndReturn(NULL);

  // Once 'ignored', we can call our API as many times as we
  // want, and database_connect() will always return NULL
  // This 'overrides' the 'Expect()' API
  app();
  app();
  app();
}

void test_app__ExpectAnyArgs(void) {
  database_connect_ExpectAnyArgsAndReturn(true);

  // We only expect database_connect_() to happen
  // once but we can expect any arguments passed to it
  app();
}

void test_app__ExpectAndIgnoreArg(void) {
  // Expect first parameter as "google"
  database_connect_ExpectAndReturn("google", 0, NULL);
  // But ignore the second param named "port"
  database_connect_IgnoreArg_port();

  app();
}
Stack Parameters
When a code module calls another code module with parameters that are on the stack memory, then that is harder to test the exact values of. In fact, the stack memory values are not deterministic at all. There is a way to ignore certain parameters in this case. Let us work with a similar example as above.
// database.h
void database_connect(db_s * db, const char *url, uint16_t port);
// File under test
#include "database.h"

void app(void) {
  db_s db = {};
  database_connect(&db, "google", 1234);

  // Further logic with db ...
}
// Unit-Tests
#include "unity.h"
#include "app.h"
#include "Mockdatabase.h"

void test_app(void) {
  // At this point, we are saying expect NULL pointer for db
  void * ignore = NULL;
  database_connect_Expect(ignore, "google", 1234);

  // But now we amend our expectation to ignore the parameter called "db"
  // The words after 'IgnoreArg' depends on the parameter name
  database_connect_IgnoreArg_db();

  app();
}
Verify struct data
If parameters into a function are an explicit type (not void*), then they can be compared just like comparing standard C types such as int, char etc.
// message_writer.h
typedef struct {
  int a, b, c;
} message_s;

void message_writer__write(message_s message);
// Code under test
void app(void) {
  message_s message = {1, 2, 3};
  message_writer__write(message);
}
void test_your_struct_writer(void) {
  message_s expected_message = {1, 2, 3};

  message_writer__write_Expect(expected_message);
  app();
}
Verify struct * pointers
What is cool is that the Expect() API also works great with pointers too. As long as your pointers are of a typed data structure (not void*), then the Expect() API can compare data structures by de-referencing the pointers. For instance, this would work equally well.
// message_writer.h
typedef struct {
  int a, b, c;
} message_s;
void message_writer__write_with_ptr(const message_s * message_ptr);
// Code under test
void app(void) {
  message_s message = {1, 2, 3};
  message_writer__write_with_ptr(&message);
}
void test_your_struct_writer(void) {
  const message_s expected_message = {1, 2, 3};

  // The Expect() will compare our struct copy
  // against the one passed in by app() function
  message_writer__write_with_ptr_Expect(&expected_message);

  app();
}
The CMock ReturnThruPtr Plugin
ReturnThruPointer
The ReturnThruPointer add convenience when you want a function to write memory at pointers passed into functions. You can achieve the same effect by writing a custom mock, and then using StubWithCallback() but this method avoid some manual boilerplate effort.
// an_api.h

typedef struct{
  char msg[10];
}message_s;
/**
 * @return Number of bytes read.
 */
int read_message(message_s *message_ptr);
#include <string.h>
#include "an_api.h"

// Code under test
int app(void) {
  message_s message;
  if (read_message(&message)) {
    if(!strcmp(message.msg, "Hello"))
      return 1;
  }
  return 0;
}
#include "Mockan_api.h"

// In Unit-Tests, we wish for the read_message() to write some
// data at the pointer passed into this function
void test_something(void) {

  // Setup your message that you wish to write to the 'input_buffer'
  // when this function is invoked: read_message(message_s *input_buffer);
  message_s message = {.msg = "Hello"};

  // Setup Expect() and ignore the buffer passed in (for now)
  expected_return_value_bytes_read = 6 //Including NULL character here.
  read_message_ExpectAndReturn(NULL, expected_return_value_bytes_read);
  read_message_IgnoreArg_message_ptr();

  // Tell the read_message() mock to return 'input_buffer' by
  // copying the 'message_s' from '&message'
  read_message_ReturnThruPtr_message_ptr(&message);

  // Carry out the test
  TEST_ASSERT_EQUAL_INT(1, app());
}
ReturnArrayThruPointer
This Mock API is the same as ReturnThruPointer except that it allows you to write an array of memory blocks.
void test_something(void) {
  message_s messages[2] = {};

  read_message_ExpectAndReturn(NULL);
  read_message_IgnoreArg_message_ptr();

  // Tell the read_message() mock to write 2 messages
  read_message_ReturnThruPtr_message_ptr(&messages, 2);

  // Carry out the test
  app();
}
ReturnMemThruPtr
This Mock API is more generic than the other two flavors above. You should avoid writing code that forces you to use this, however, there are cases when you must. Case in point, when the input to a Mocked function is a void* parameter, then the other two ReturnThru variants will not know how much memory to write, and hence this is where ReturnMemThruPtr comes to the rescue.
void test_something(void) {
  message_s message = {};

  read_message_ExpectAndReturn(NULL);
  read_message_IgnoreArg_message_ptr();

  // Tell the read_message() mock to write 2 messages
  read_message_ReturnMemThruPtr_message_ptr(&message, sizeof(message));

  // Carry out the test
  app();
}
Test static
static functions and variables can be accessed by your unit-tests using a small trick. The Coding Standards article discussed the Include Order which is necessary to build code without compiler errors, while facilitating unit-testing easily.
There are a couple of ways to test static methods and access static variables. The first solution is to use the Include Order to your advantage, and then totally hijack static keyword by telling the compiler to not have the keyword take effect at all. This also means that you cannot have local variables that are static, but that is part of our Coding Standards
The second solution is to consistently use capital STATIC which is defined to static for production code, and <blank> during unit-test build. We deliberated about these two solutions and ultimately decided to use the first approach above and here is the summary of our discussion:
Code looks normal is not compromised in appearance due to unit-testing
We will not need to explain and justify a new
STATICkeyword
STATICis hard to enforce and will create inconsistenciesDevelopers will mix
staticandSTATICand slow down code-reviewsDevelopers will need training on the guideline
Even with
STATIC, we still are dependent on an include order
The reason for this debate is that due to #define static /* blank */, if the Include Order is not followed, it can have un-intended consequencies in your unit-test build. For example, if <stdio.h> uses the static keyword, and we include sl_unit_test_facilitator.h before we include <stdio.h> then the compilation may fail. Same is true if other code modules are included that should not inherit this static hack.
sl_unit_test_facilitator.h
#ifdef UNIT_TESTING
  #define static /* blank */
#else
  #define static static
#endif
static functions
It is expected that you may have code and you wish to test a static function directly. Let's assume you wish to test the following code:
// Including this file will override 'static' keyword to <blank>
#include "sl_unit_test_facilitator.h"

// your_code_under_test.c
static void app_private_function(void) {

}

void app(void) {
  // Maybe the logic to get to app_private_function() is not that easy
  // How can we hit this function in our tests directly?
  if (0 == rand() % 60) {
    app_private_function();
  }
}
You can then test by accessing the static functions directly because when your application code included sl_unit_test_facilitator.h, it re-defined static to <blank>, and thereby taking away the private meaning to the use case of static in a source file.
Although the code under test now will not use the true static keyword, we will need to still find function declarations that we can use to test code. There are two solutions here:
The
staticfunctions that are inside ofyour_code_module.ccan be defined asexternat your unit-test fileExample below illustrates that
The
staticfunctions that are inside ofyour_code_module.ccan be declared in a new file, such asyour_code_module_private.hThis header file is included by
your_code_module.cThis header file is also included by
test_your_code_module.c
// Define 'extern' to access those 'static' members
extern void app_private_function(void);

void test_app_private_function(void) {
  app_private_function();
}
static variables
In general, global variables should be avoided when possible because you should build your code modules that operate on an instance, just like a C++ class functions operate on the instance of the class.
typedef struct {
  int x;
} module_s;

void module__api(module_s* module);
void module__foo(module_s* module, int x);
In the case above, the code module itself does not contain any global variables, and they operate on an instance the user provides, and this helps the testability aspect too.
However, since we do not live in a perfect world, let us assume that there are some private variables you need to access in your_module.c for testability purpose. We can access them as long as we #include "sl_unit_test_facilitator.h" at your source code.
// your_module.c

// Including this file will override 'static' keyword to <blank>
#include "sl_unit_test_facilitator.h"

static int x = 0;
static module_s module = { };
If your module includes sl_unit_test_facilitator.h, your unit-test code can then access the static data members. Note that that we are not altering the meaning of static in production code, and this "hack" is only for unit-tests.
// Define 'extern' to access those 'static' members of your_module.c
extern int x;
extern module_s module;

// Your setUp() method can now reset those variables
// at the beginning of each test_ method
void setUp(void) {
  x = 0;
  sl_utils__memset_zero(&module, sizeof(module));
}
Caveats
Unable to use static inside of a function
The one caveat of #define static to <blank> is that it may affect you when this keyword is used inside of a function, like so:
void foo(void) {
  static int x = 0;
}
This use case should not exist and your coding standards should ban this kind of use of a static variable. In any case, this will only affect your unit-tests, and the enormous benefits that #define static provides offsets the cost of not being able to use a static variable inside of a function. Not doing so also improves your unit-testing because it is very difficult to reset a function's static variables to their initial value.
CMock compiler error
The second caveat is that we cannot globally re-define static to <blank> for the entire unit-test build. While this may work for some unit-tests, it will particularly fail for unit-tests that use Mocks. For example, we cannot create a common_header.h that conveniently re-defines static keyword because every includer of that file will inherit this hack. When CMock inherits this and creates your Mock files, there will be a link time failure because there may be duplicate symbols with the same name. The Common Headers section also discusses this issues and proposes a workaround.
Test a large blob
But why do you have a large blob? You should first consider breaking up this module into smaller modules. In the code below, for us to get as far as grid_is_on(), we have to setup a large chain of ExpectAndReturn() functions before we finally reach the grid_is_on() function.
void state_machine(void) {
  if (foo()) {

  } else if (bar()) {

  } else if (inverter_is_on() && inverter_is_not_faulted() && grid_is_on()) {

  }
}
Improvement A
In this approach, we can refactor (inverter_is_on() && inverter_is_not_faulted() && grid_is_on()) into a separate code module that handles multiple conditions of an inverter. Then, the state_machine() is easier to test and the tests of multiple && conditions is moved to another module.
#include "inverter_status.h"

void state_machine(void) {
  if (foo()) {

  } else if (bar()) {

  } else if (inverter_is_ready()) {

  }
}
Improvement B
In this approach, we refactor code such that all of the inputs are collected at once with minimal short-circuit logic, and then the inputs are passed into another function. The advantage of this approach is that you have used sort of divide and conquer. You can test state_machine_input_generator() and state_machine_process_inputs() separately and this provides ease of unit-testing.
void state_machine_input_generator(void) {
  const bool f = foo();
  const bool b = bar();
  const bool inverter_ready = inverter_is_on() && inverter_is_not_faulted() && grid_is_on();
  state_machine_process_inputs(f, b, inverter_ready);
}

void state_machine_process_inputs(bool f, bool b, bool inverter_is_ready) {
  if (f) {

  } else if (b) {

  } else if (inverter_is_ready) {

  }
}
Test forever loops
// For unit-testing, a 'FOREVER' loop runs just once
#ifdef UNIT_TESTING
  FOREVER for(bool __once = true; __once; __once = !__once)
#else
  FOREVER while(true)
#endif

// Code under test
void rtos_task(void *p) {
  FOREVER {

  }
}

// Unit-Tests
void test_rtos_task(void) {
  // This will run the loop just once
  rtos_task();
}
Test the main Function
The main() function may be tricky to test because when the unit-tests are run, they have their own main() and you cannot have another main() because that would lead to multiple symbols defined with the same name (linker error).
The approach to fix this problem would be to use a macro.
// If we are unit-testing, then rename the main()
#ifdef UNIT_TESTING
  #define MAIN application_main
// If we are compiling production code, then MAIN() is main()
#else
  #define MAIN main
#endif

// Your application code
void MAIN(void) {

}

// Your test code
void test_main(void) {
  // Setup expects()
  MAIN();
}
Test the 'Untestable'
Consider the following code:
bool save_data_to_file(const data_s *some_struct) {
  bool status = false;

  if (NULL != some_struct) {
    void *const file_descriptor = fopen("file.txt", "w");
    if (NULL != file_descriptor) {
      fwrite(some_struct, 1, sizeof(*some_struct), file_descriptor);
      fclose(file_descriptor);
      status = true;
    }
  }

  return status;
}
It would be really difficult on a POSIX OS to be able to fail writing "file.txt", and hence it would be difficult to unit-test the if (NULL != file_descriptor) failure case. There are two ways to solve this issue:
Refactor
fopen()and similar File I/O into a "shim" layerThis will allow you to "mock" the shim layer and simulate failure cases
Refactor the logic inside of the
if (NULL != file_descriptor)branch statement to a separate functionThis will allow you to hit the "private" function directly.
See sample code below
// You can hit this function directly, and achieve code coverage on 'if (NULL != file_descriptor)'
static bool private__fwrite(const data_s *some_struct, void *file_descriptor) {
  bool status = false;

  if (NULL != file_descriptor) {
    const size_t bytes_written = fwrite(some_struct, 1, sizeof(*some_struct), file_descriptor);
    (void)dev_file_io__fclose(file_descriptor);
    status = true;
  }

  return status;
}

bool save_data_to_file(const data_s *some_struct) {
  bool status = false;

  if (NULL != some_struct) {
    void *const file_descriptor = fopen("file.txt", "w");
    status = private__fwrite(some_struct, file_descriptor);
  }

  return status;
}
Tips & Tricks
Refactor
Code can be refactored to improve testing. The suggestion here is to first write unit-tests, and then refactor the real code. For example, if you built a bit-counting module, write unit-tests to test it fully. After doing so, you can then refactor and optimize code and your unit-tests would instantly validate if your change is free of bugs.
The NOOP trick
The NOOP trick is meant to spot code coverage issues.
#ifndef UNIT_TESTING
#define NOOP(message) /* Nothing */
#else
#define NOOP(message)                      \
  do {                                 \
    volatile int _do_not_optimize = 0; \
    (void) _do_not_optimize;           \
  } while (0)
#endif
In the example below, if you miss testing the else part of the branch, you can spot it very easily using the standard gcov and lcov code coverage tools.
void foo(void) {
  if (condition) {

  } else {
    NOOP("Should not get here");
  }
}
Common Headers
Here are the consolidated and common header files which you may use in your code. Note that you should avoid defining these in a makefile or similar because your IDE or code indexer may not be able to pick up these code #defines. Further, hiding macros degrades code readability.
sl_unit_test_facilitator.h
Only include this file for your_module_under_test.c such as app.c. The purpose is to alter the definition for this file only, and not globally for everything. Case in point, if you put this in a header file, and your_module.h includes it, then any user that includes this header will inherit the new definition of static. This may sound okay, however, when the CMock framework comes in to Mock a header file, it will also inherit the new definition of static and cause compile time errors.
/**
 * @{
 * @name Macros that give different meaning depending on if we are compiling for UTs or production code
 *
 * For Unit-Tests, we do not define any meaning to 'static' because it is intentional
 * to not hide private variables and functions for the sake of unit-testing.
 *
 * This may create a problem with local variables of a function that are static, but
 * our coding standards forbid such use.
 *
 * In any case, this only affects our unit-tests, and not production code
 */
#ifdef UNIT_TESTING
  #define const         /* blank */
  #define static        /* blank */
#else
  #define const         const
  #define static        static
#endif
/** @} */
common_header.h
/**
 * @{
 * @name Macros that give different meaning depending on if we are compiling for UTs or production code
 *
 * 'FOREVER' helps test loops as this code will only run once in your unit-tests
 * 'MAIN' helps test your application main()
 */
#ifdef UNIT_TESTING
  #define FOREVER       for(bool __once = true; __once; __once = !__once)
  #define MAIN          application_main
#else
  #define FOREVER       for(;;)
  #define MAIN          main
#endif
/** @} */

/**
 * For production code, which is NOT UNIT_TEST, the NOOP() is truly a NOOP
 * For unit-test code, this helps spot branch coverage issues.  Example use case:
 * @code
 * if (foo) {
 * } else {
 *   NOOP("This branch should not happen");
 * }
 * @endcode
 */
#ifdef UNIT_TESTING
  #define NOOP(message)                      \
    do {                                 \
      volatile int _do_not_optimize = 0; \
      (void) _do_not_optimize;           \
    } while (0)
#else
  #define NOOP(message)
#endif
Code Lab
Lab 1
Let us practice unit-testing, with a little bit of TDD thrown into the mix.
steering.h: This is just a header file and we will Mock out this file and therefore you do not need to write this file's implementation.
#pragma once

void steer_left(void);
void steer_right(void);
steer_processor.h: You will write the implementation of this file yourself at steer_processor.c
#pragma once

#include <stdint.h>

#include "steering.h"

/**
 * Assume that a threshold value is 50cm
 * Objective is to invoke steer function if a sensor value is less than the threshold
 *
 * Example: If left sensor is 49cm, and right is 70cm, then we should call steer_right()
 */
void steer_processor(uint32_t left_sensor_cm, uint32_t right_sensor_cm);
test_steer_processor.c You will write the test code, before you write the implementation of steer_processor() function.
#include "unity.h"

#include "steer_processor.h"

#include "Mocksteering.h"

void test_steer_processor__move_left(void) {

}

void test_steer_processor__move_right(void) {

}

void test_steer_processor__both_sensors_less_than_threshold(void) {

}

// Hint: If you do not setup an Expect()
// then this test will only pass none of the steer functions is called
void test_steer_processor__both_sensors_more_than_threshold(void) {

}

// Do not modify this test case
// Modify your implementation of steer_processor() to make it pass
// This tests corner case of both sensors below the threshold
void test_steer_processor(void) {
  steer_right_Expect();
  steer_processor(10, 20);

  steer_left_Expect();
  steer_processor(20, 10);
}
Do the following:
Put the
steering.hin your source codePut the
steer_processor.hin your source codePut the
test_steer_processor.cin your test code folderWrite the implementation of
test_steer_processor.cand run the tests to confirm failing testsWrite the implementation of
steer_processor.c
Lab 2a
Write the unit-tests first, and then the implementation for the following header file:
#pragma once

#include <stdbool.h>
#include <stddef.h>
#include <stdint.h>

/* In this code lab, the queue memory is statically defined
 * and fixed at compile time for 100 uint8s
 */
typedef struct {
  uint8_t queue_memory[100];

  // TODO: Add more members as needed
} queue_s;

void queue__init(queue_s *queue);

/// @returns false if the queue is full
bool queue__push(queue_s *queue, uint8_t push_value);

/// @returns false if the queue was empty
bool queue__pop(queue_s *queue, uint8_t *pop_value);

size_t queue__get_item_count(const queue_s *queue);
Lab 2b
Write the unit-tests first, and then the implementation for the following header file. This is a slight variation of the previous lab and it provides you with the static memory based programming pattern popular in Embedded Systems where we deliberately avoid allocating memory on the heap.
#pragma once

#include <stdbool.h>
#include <stddef.h>
#include <stdint.h>

/* In this code lab, the queue memory is statically defined
 * by the user and provided to you upon queue__init()
 */
typedef struct {
  void *static_memory_for_queue;
  size_t static_memory_size_in_bytes;

  // TODO: Add more members as needed
} queue_s;

/* Initialize the queue with user provided static memory
 * @param static_memory_for_queue This memory pointer should not go out of scope
 */
void queue__init(queue_s *queue, void *static_memory_for_queue, size_t static_memory_size_in_bytes);

/// @returns false if the queue is full
bool queue__push(queue_s *queue, uint8_t push_value);

/// @returns false if the queue was empty
bool queue__pop(queue_s *queue, uint8_t *pop_value);

size_t queue__get_item_count(const queue_s *queue);
Lab 3
In this lab, the objectives are:
Practice
StubWithCallbackorReturnThruPtrIgnore particular arguments
message.h: This is just an interface, and we will Mock this out.
#pragma once
#include <stdbool.h>

typedef struct {
  char data[8];
} message_s;

bool message__read(message_s *message_to_read);
message_processor.c: This code module processes messages arriving from message__read() function call. There is a lot of nested logic that is testing if the third message contains $ or # at the first byte. To get to this level of the code, it is difficult because you would have to setup your test code to return two dummy messages, and a third message with particular bytes.
To improve testability, you should refactor the } else { logic into a separate static function that you can hit with your unit-tests directly.
#include <stdbool.h>
#include <stddef.h>
#include <string.h>

#include "message_processor.h"
#include "sl_common.h"

bool message_processor(void) {
  bool symbol_found = false;
  message_s message;
  memset(&message, 0, sizeof(message));

  const static size_t max_messages_to_process = 3;
  for (size_t message_count = 0; message_count < max_messages_to_process; message_count++) {
    if (!message__read(&message)) {
      break;
    } else if (message_count < 2) {
      NOOP("Wait for last message");
    } else {
      if (message.data[0] == '$') {
        message.data[1] = '^';
        symbol_found = true;
      } else if (message.data[0] == '#') {
        message.data[1] = '%';
        symbol_found = true;
      } else {
        NOOP("Symbol not found");
      }
    }
  }

  return symbol_found;
}
test_message_processor.c: Add more unit-tests to this file as needed.
#include "unity.h"

#include "Mockmessage.h"

#include "message_processor.h"

void test_process_3_messages(void) {
  message__read_ExpectAndReturn(NULL, true);
  message__read_IgnoreArg_message_to_read();

  message__read_ExpectAndReturn(NULL, true);
  message__read_IgnoreArg_message_to_read();

  message__read_ExpectAndReturn(NULL, true);
  message__read_IgnoreArg_message_to_read();

  TEST_ASSERT_EQUAL(0, message_processor());
}
Code Coverage
When the unit-test code is compiled with the -coverage compiler option, it will produce *.gcov files for each source code file. The gcov tool can then b run on *.gocv files to produce coverage artifacts that are useful to identify code coverage. But unfortunately the artifacts are *.gcda which are not human readable.
The *.gcda can then be absorbed by lcov tool that can turn those into HTML reports which can help the developers spot code coverage and improve their unit-testing.